

Can You Register A New Code With An Existing Adp Account
This browser is no longer supported.
Upgrade to Microsoft Edge to take advantage of the latest features, security updates, and technical support.
In this tutorial, you lot'll learn how to integrate ADP with Azure Agile Directory (Azure AD). When you integrate ADP with Azure Advertizement, you tin:
- Control in Azure Advertising who has admission to ADP.
- Enable your users to be automatically signed-in to ADP with their Azure Advertizing accounts.
- Manage your accounts in one central location - the Azure portal.
Prerequisites
To get started, you need the post-obit items:
- An Azure AD subscription. If you lot don't have a subscription, you can get a costless business relationship.
- ADP single sign-on (SSO) enabled subscription.
Note
This integration is besides available to use from Azure AD U.s.a. Government Cloud surround. Yous tin find this application in the Azure AD US Government Cloud Application Gallery and configure it in the same way as you do from public cloud.
Scenario description
In this tutorial, you configure and examination Azure AD SSO in a test environment.
- ADP supports IDP initiated SSO.
Note
Identifier of this application is a fixed cord value so only one example can be configured in i tenant.
Add ADP from the gallery
To configure the integration of ADP into Azure Advertizement, you need to add ADP from the gallery to your listing of managed SaaS apps.
- Sign in to the Azure portal using either a work or schoolhouse account, or a personal Microsoft business relationship.
- On the left navigation pane, select the Azure Agile Directory service.
- Navigate to Enterprise Applications and and so select All Applications.
- To add new application, select New application.
- In the Add together from the gallery section, blazon ADP in the search box.
- Select ADP from results panel and then add the app. Await a few seconds while the app is added to your tenant.
Configure and test Azure AD SSO with ADP using a examination user called B.Simon. For SSO to work, yous need to plant a link relationship betwixt an Azure Advertizing user and the related user in ADP.
To configure and test Azure Advertisement SSO with ADP, perform the post-obit steps:
- Configure Azure Advertisement SSO - to enable your users to use this feature.
- Create an Azure Advert exam user - to exam Azure AD single sign-on with B.Simon.
- Assign the Azure Ad test user - to enable B.Simon to employ Azure Advertisement single sign-on.
- Configure ADP SSO - to configure the Single Sign-On settings on application side.
- Create ADP test user - to have a counterpart of B.Simon in ADP that is linked to the Azure Advertizement representation of user.
- Test SSO - to verify whether the configuration works.
Follow these steps to enable Azure Ad SSO in the Azure portal.
-
In the Azure portal, on the ADP application integration folio, click on Properties tab and perform the following steps:
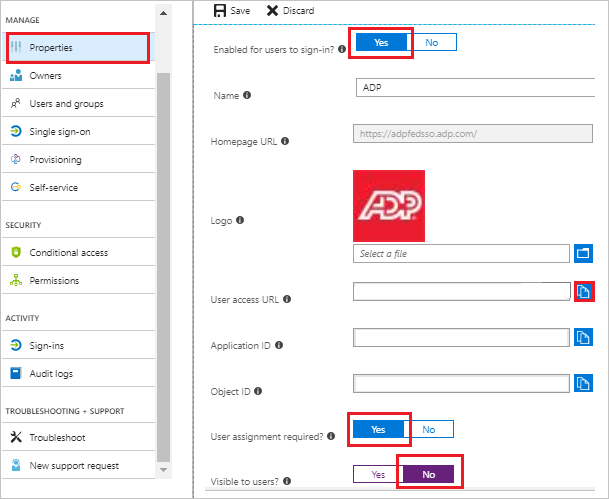
a. Set the Enabled for users to sign-in field value to Yes.
b. Copy the User access URL and yous have to paste it in Configure Sign-on URL section, which is explained later in the tutorial.
c. Set the User assignment required field value to Yep.
d. Set the Visible to users field value to No.
-
In the Azure portal, on the ADP application integration page, notice the Manage section and select Single sign-on.
-
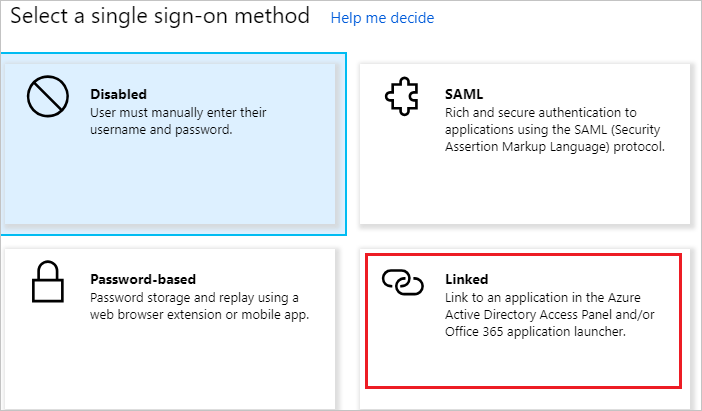
On the Select a Single sign-on method folio, select SAML.
-
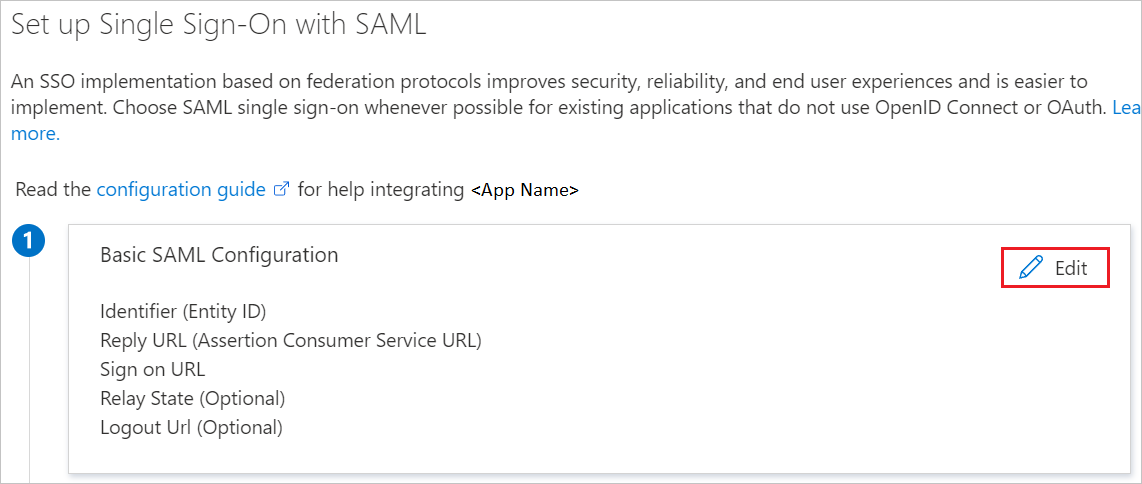
On the Set Single Sign-On with SAML folio, click the pencil icon for Basic SAML Configuration to edit the settings.
-
On the Basic SAML Configuration section, perform the following steps:
In the Identifier (Entity ID) text box, type the URL:
https://fed.adp.com -
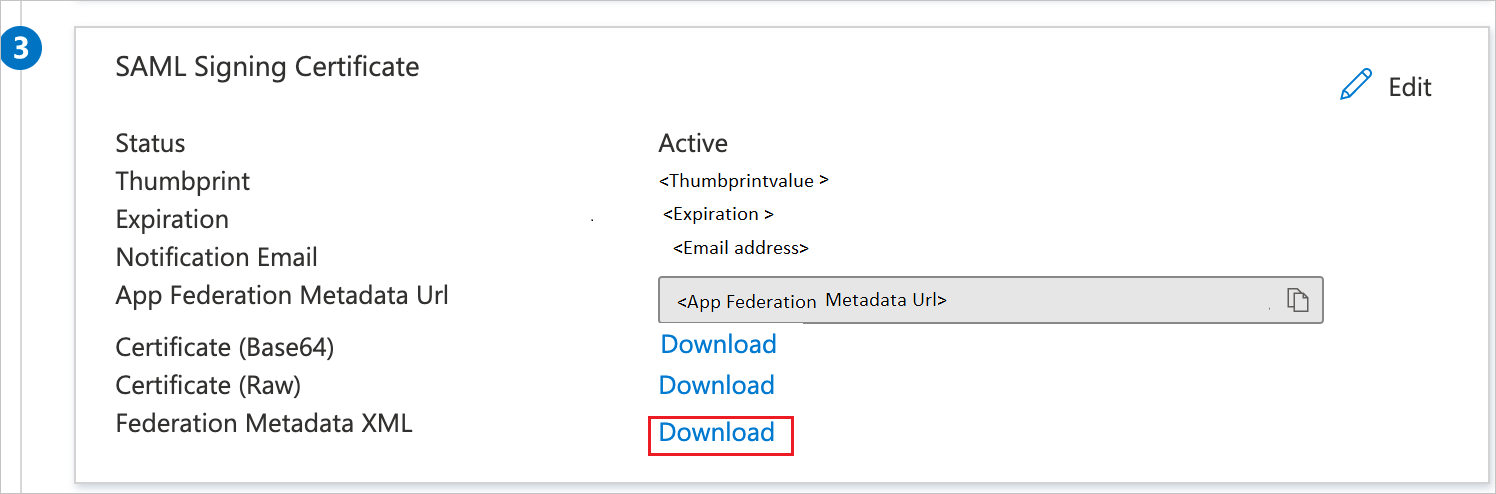
On the Gear up Single Sign-On with SAML page, in the SAML Signing Certificate section, notice Federation Metadata XML and select Download to download the certificate and salvage it on your computer.
-
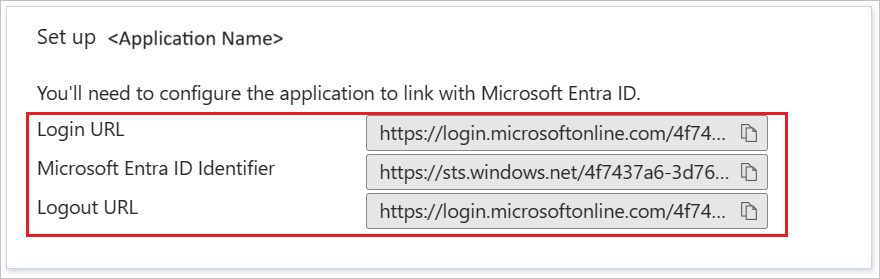
On the Gear up up ADP section, copy the appropriate URL(s) based on your requirement.
Create an Azure AD test user
In this section, you'll create a test user in the Azure portal called B.Simon.
- From the left pane in the Azure portal, select Azure Active Directory, select Users, and and so select All users.
- Select New user at the top of the screen.
- In the User backdrop, follow these steps:
- In the Name field, enter
B.Simon. - In the User proper name field, enter the username@companydomain.extension. For example,
B.Simon@contoso.com. - Select the Testify password cheque box, and so write downwardly the value that'due south displayed in the Countersign box.
- Click Create.
- In the Name field, enter
Assign the Azure Advertizing test user
In this section, you'll enable B.Simon to use Azure single sign-on by granting access to ADP.
- In the Azure portal, select Enterprise Applications, and then select All applications.
- In the applications list, select ADP.
- In the app'due south overview folio, find the Manage section and select Users and groups.
- Select Add user, then select Users and groups in the Add Assignment dialog.
- In the Users and groups dialog, select B.Simon from the Users list, and then click the Select button at the lesser of the screen.
- If you are expecting a part to be assigned to the users, yous can select it from the Select a role dropdown. If no role has been prepare for this app, you encounter "Default Access" part selected.
- In the Add Assignment dialog, click the Assign button.
Configure ADP SSO
To configure single sign-on on ADP side, you lot need to upload the downloaded Metadata XML on the ADP website.
Note
This procedure may have a few days.
Configure your ADP service(s) for federated access
Important
Your employees who require federated access to your ADP services must be assigned to the ADP service app and subsequently, users must be reassigned to the specific ADP service. Upon receipt of confirmation from your ADP representative, configure your ADP service(southward) and assign/manage users to control user admission to the specific ADP service.
-
Sign in to the Azure portal using either a work or schoolhouse business relationship, or a personal Microsoft account.
-
On the left navigation pane, select the Azure Active Directory service.
-
Navigate to Enterprise Applications and then select All Applications.
-
To add together new awarding, select New application.
-
In the Add together from the gallery section, blazon ADP in the search box.
-
Select ADP from results panel and so add the app. Expect a few seconds while the app is added to your tenant.
-
In the Azure portal, on your ADP awarding integration folio, click on Properties tab and perform the following steps:

-
Set up the Enabled for users to sign-in field value to Yes.
-
Set the User assignment required field value to Yep.
-
Fix the Visible to users field value to Yes.
-
-
In the Azure portal, on the ADP awarding integration folio, find the Manage section and select Unmarried sign-on.
-
On the Select a Single sign-on method dialog, select Mode equally Linked. to link your application to ADP.
-
Navigate to the Configure Sign-on URL department, perform the following steps:

-
Paste the User access URL, which yous have copied from to a higher place backdrop tab (from the master ADP app).
-
Following are the 5 apps that support different Relay State URLs. You have to suspend the appropriate Relay State URL value for particular application manually to the User access URL.
-
ADP Workforce Now
<User admission URL>&relaystate=https://fed.adp.com/saml/fedlanding.html?WFN -
ADP Workforce Now Enhanced Time
<User access URL>&relaystate=https://fed.adp.com/saml/fedlanding.html?EETDC2 -
ADP Vantage HCM
<User access URL>&relaystate=https://fed.adp.com/saml/fedlanding.html?ADPVANTAGE -
ADP Enterprise Hr
<User access URL>&relaystate=https://fed.adp.com/saml/fedlanding.html?PORTAL -
MyADP
<User access URL>&relaystate=https://fed.adp.com/saml/fedlanding.html?REDBOX
-
-
-
Save your changes.
-
Upon receipt of confirmation from your ADP representative, begin test with one or ii users.
-
Assign few users to the ADP service App to exam federated access.
-
Examination is successful when users access the ADP service app on the gallery and tin can access their ADP service.
-
-
On confirmation of a successful test, assign the federated ADP service to individual users or user groups, which is explained afterwards in the tutorial and roll it out to your employees.
Create ADP test user
The objective of this department is to create a user called B.Simon in ADP. Work with ADP support squad to add the users in the ADP business relationship.
Test SSO
In this section, you test your Azure Advertizing unmarried sign-on configuration with post-obit options.
-
Click on Test this application in Azure portal and you should be automatically signed in to the ADP for which you lot ready the SSO.
-
You lot can use Microsoft My Apps. When y'all click the ADP tile in the My Apps, yous should be automatically signed in to the ADP for which y'all set the SSO. For more information about the My Apps, see Introduction to the My Apps.
Next steps
Once you configure ADP you tin can enforce session control, which protects exfiltration and infiltration of your organization's sensitive data in real fourth dimension. Session control extends from Provisional Access. Learn how to enforce session control with Microsoft Defender for Cloud Apps.
Feedback
Submit and view feedback for

Can You Register A New Code With An Existing Adp Account,
Source: https://docs.microsoft.com/en-us/azure/active-directory/saas-apps/adpfederatedsso-tutorial
Posted by: freemanpinhould1981.blogspot.com
0 Response to "Can You Register A New Code With An Existing Adp Account"
Post a Comment